
Over the past few years, we have had hundreds of baseball players, specifically pitchers come through our facility. While they come in all shapes, sizes and technical ability, they all are looking to do the same thing, how to throw a baseball harder and do so safely working with a baseball throwing program. So, while this article is about how we build throwing programs, it’s important to highlight that the body has its own language and agenda, and you cannot learn it by only learning 3 or 4 words. You certainly can’t do it by slapping together some throwing drills with long toss and pull-down days.
There are many pieces to the puzzle when working towards improving an athlete’s performance. This requires different combinations and covers multiple disciplines integrated into one cohesive program.
With that being said, today, we’ll discuss how we design our player’s throwing programs from start to finish in four parts…
-
- Part 1. Collecting Information
- Part 2. Establish a Starting Point and an End Point
- Part 3. Programming
- Part 4. Where Do We Begin?
Part 1. Collecting Information
When beginning to write or “build” a baseball throwing program for an athlete, we first need to determine what the specific needs of the athlete are, so that we can maximize the effectiveness of the program. Pitchers in our facility come in all different strengths and sizes and each with slightly different timelines. This plays a large role in determining each athlete’s specific needs and how much can be effectively done within the given timeline. Thus, some of the questions we need to ask are:
What has the athlete been doing recently regarding throwing?
Have they completely shut down? Did they just finish a long spring / summer season did they play deep into the fall? The answers to these questions will determine the amount of time needed for the on-ramp phase and the amount of time we can spend in the phases following the ramp-up.
An athlete who has shut down for 4 weeks needs a longer on-ramping phase as well as a different program design than an athlete who has consistently been throwing.
What are the athlete’s goals?
Many times, what an athlete thinks he wants may not always be what is best for him, or his career. If we think this is the case, our job as coaches is to give the athlete some objective advice from an outside source (you).
For example, if an athlete that comes to us throwing 96 mph and wants to try to get to 98 but has three pitches that all move the same way (then he really only has one pitch), he may be better served spending his time with us focusing on pitch design and getting those balls to “spread out” and giving himself three really good pitches.
What is the athlete’s timeline?
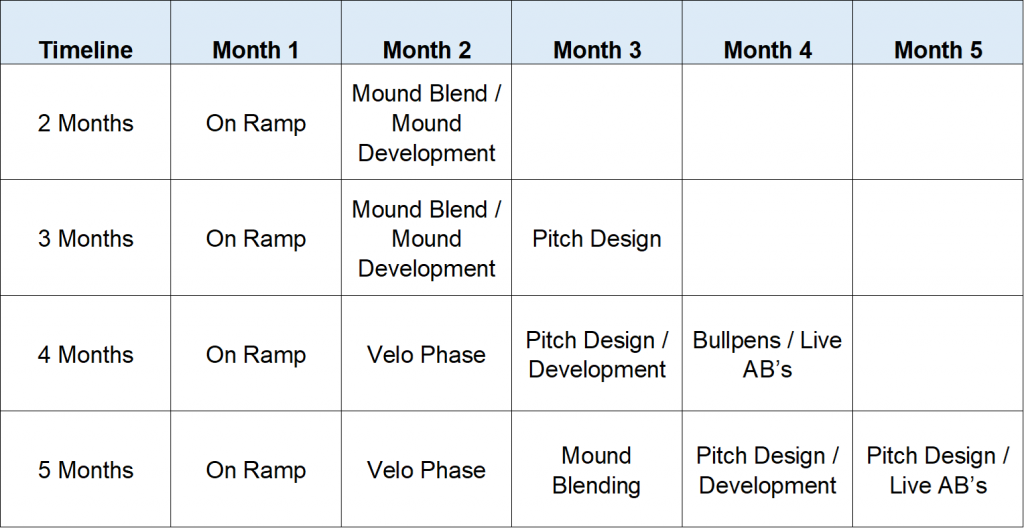
Athletes have different time frames for when they need to be able to throw 100% off the bump. For example, does the athlete have 2 months, 4 months, or 5-6 months to train with us.
Knowing these time frames allows us to back-up from the finish line in order to find out just how many weeks the athlete spends in each throwing phase, as well as how many months we actually have to get the athlete ready for competition. In other words, we periodize the program appropriately (and always starting with an “on-ramp”). For example, an athlete who has taken 2 months off and comes to us in mid-December with a “ready” date of March 1st leaves us with just enough time to on-ramp (Month 1) and get in our mound development but little to no time for velocity work so a velo phase is not an option at this point. We will get further into this in a bit.
Part 2. Establish a Starting Point and an Endpoint
Establishing a starting point or getting from point A (where the athlete is currently), from both a physical and technical point, to point B (what the gold standard is for this particular athlete based on his given goals) entails collecting data from a few areas and grabbing the lowest hanging fruit.
-
- Movement Analysis
- Mocap and Video Analysis
- Rapsodo / Ball Movement
A. Movement Analysis – By observing an athlete’s movement strategy during an assessment , we can better understand his weak links in the chain of movement, which could also be contributing to inefficient mechanics in the video analysis/mocap portion of the assessment.
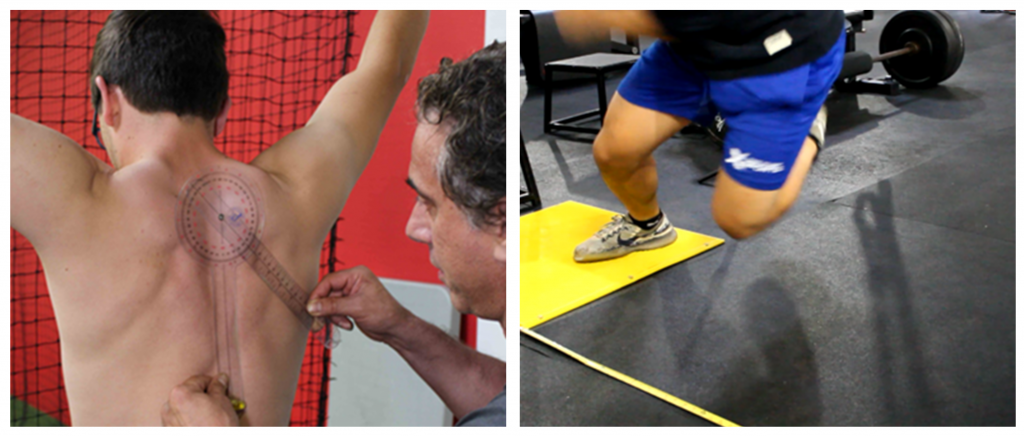
Adding mobility/stability patterning in the athletes daily warm can help them to be more successful when moving through their delivery on the mound. If movement is the lowest hanging fruit, we may spend the first few weeks simply restoring range-of-motion in the weight room while working on only light constraint drills such as reverse throws or scap retraction throws.
(Reverse Throws)
Skipping these beginning stages of program design and simply jumping directly into cuing throwing drills with an athlete that cannot physically get into a specific position is like trying to fit a square peg into a round hole.

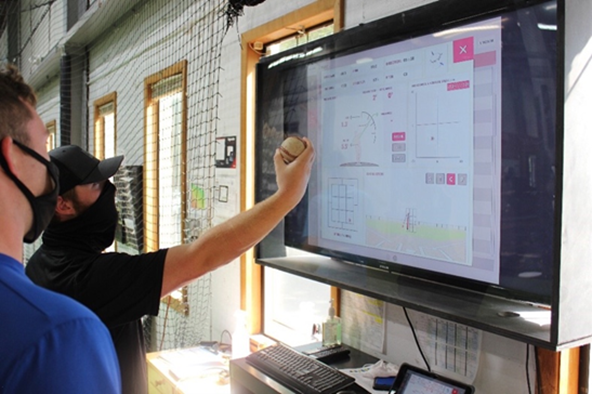
B. Mocap and Video Analysis – Being the newest piece to our puzzle, our motion capture report gives us invaluable information on timing-related issues, as well as angular velocities and joint kinetics. This information is then combined with the table assessment to help prescribe the correct throwing drills and mobility work used in the baseball throwing program.
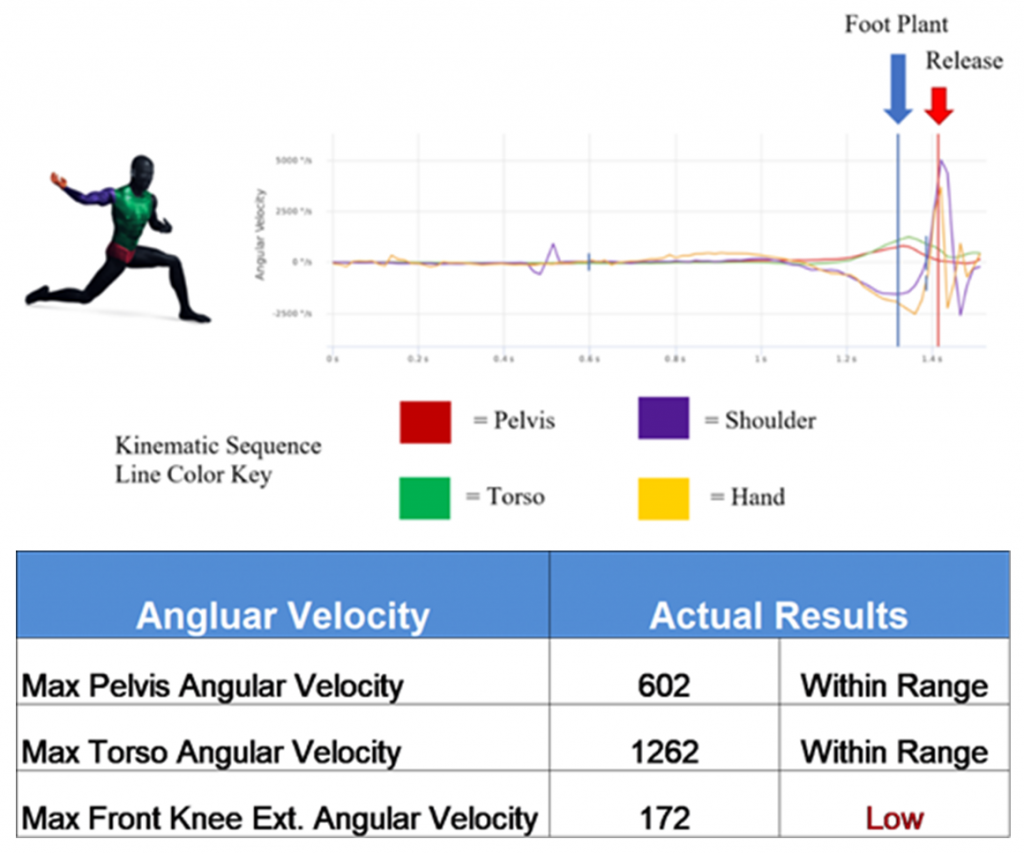
We then combine this information with our video analysis. While Mocap can be an invaluable tool, its combination with video creates the perfect storm.
The ability to watch video and actually see the delivery in its entirety to better understand what needs to be done will always be an integral part of the assessment and learning process. In addition, nothing will ever equate to live visuals when trying to help athletes better understand the process.
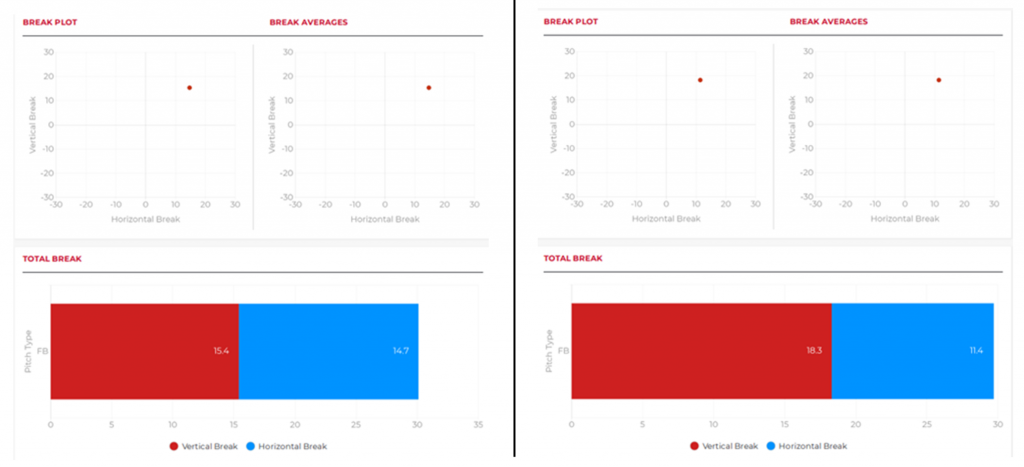
C. Rapsodo / Ball Movement – When designing a baseball throwing program that will include pitch design, establishing baseline metrics on Rapsodo is a must.
In order to accurately monitor ball movement, Rapsodo bullpens must be done at high intensity (above 80% RPE) and are programmed twice/week, with day 2 involving less coaching and slightly less intensity. To be a bit more specific with the metrics, the following are what we generally focus on with our pitchers and are designed to build up a pitcher’s throwing arsenal during our mound development phase:
-
- Spin Axis
- Spin Efficiency
- Horizontal and Vertical Break
Note: When it comes to pitch design, allowing a minimum of 4-6 weeks is enough time to identify topics you would like to address and “begin” to make improvements on them.
Part 3. Programming
-
- Design the Warm-up
- Selecting the Throwing Drills
- Training Day Intensity and Volumes
- Phases and Periodization
- Performing Long Toss
A. Design the Warm-up – The warm-up is a staple in all our throwing programs and designed based off the movement assessment and our mocap/video analysis. This is done every day regardless of which method / Intensity or phase is being employed.
-
- Warm up (soft tissue quality, mobility based off assessment)
- Dynamic warm up (movement)
- Band activations (excluding recovery days)
- Post-throw / Recovery
(Bowler Squat w/ Reverse Throws)
B. Selecting the Throwing Drills – For us, the selection of an athlete’s throwing drills is much like the assessment. We go with the lowest hanging fruit and work our way up. We generally prescribe anywhere from 3-5 drills at the start of the throwing program based off of movement and/or timing issues that may occur anywhere between leg lift through the striding phase, max ER into foot plant, acceleration and ultimately the finish, within three main parts of the delivery:
-
- Arm Action/glove side integrity
- Center-of-mass (COM)
- Lower half
We can and usually will interchange one drill for another once an issue has cleaned up. The first two that we usually address are arm action and/or center of Mass (COM) timing. These issues generally lead us to where the main issue is, which more often than not and especially in most younger and amateur athletes is usually the lower half.
However, if there is a glaring arm issue that doesn’t seem to involve lower half timing, we’ll attack that first as they are usually the quickest to clean up.
Once again, this is assuming that mocap report and video shows that they are not stemming from inefficient lower half sequencing/timing.
(Marshalls)
C. Training Day Intensity and Volumes – Because most baseball throwing programs involve 5 days of throwing, they are broken down daily based off of throwing intensity. What type of throwing is done on these days differs from program-to-program based on the athlete’s goals and what the program is trying to achieve. We’ve listed examples next to the different types of days but please note that there is more than one type of method for each type of day.
It’s also important to note that every phase contains high, medium and low intensity days. Intensities are NOT used to describe the phase itself.
Intensity refers to effort level or “RPE” (rate of perceived exertion) as well as volume or the total amount of throws performed on a particular day.
-
- Low Intensity (recovery) – Otherwise known as “recovery days”, both low volume and intent are used to promote recovery in between medium and/or high intent days
- Medium Intensity (long toss, out only) – A higher amount of volume (reps) is used in this phase to slowly build the arms ability to accept higher workloads when ramping up and maintain workload during the week in all other phases
- High Intensity (pull-downs) – Used to help transition throwing into “game-time intensities (100%) and give realistic feedback (>80% RPE) on pitch design days. Because of the higher intensities, volume is scaled back.
What’s more important is the “why” and the “purpose” for what we perform each day.
D. Phases and Periodization – There are several different phases which go into a baseball throwing program from a periodization standpoint.
The On-Ramp
-
- Purpose: The on ramp helps build throwing tolerance and to build throwing workload. We also use this time to introduce weighted ball corrective drills to help re-pattern any mechanical issues in the delivery during this phase
- Duration: 2-6 weeks (a good general rule is 1 week of on ramp for every week off from throwing)
- When: Generally, after taking 2 or more weeks off from throwing
Here is a good example of the on-ramp program. We generally combine the on-ramp with an early off-season strength program, both designed to better prepare the athlete for heavier things to come.
Velocity Phase
-
- Purpose: Maximize throwing velocity by building “intent” and to develop and train skill work at a game like intensity
- Duration: 4-6 weeks, Time can be split between flat ground and then transitioning or “blending” to the mound
- When: Typically, after an on-ramping phase- but only if there is adequate time for mound development after
Blend-to-Mound Phase
-
- Purpose: To help athletes adjust back to the mound prior to throwing with full intent
- Duration: 2 weeks, if coming out of a 4-week velo phase… 4weeks, if coming out of an on-ramp phase with no time for velo phase
- When: Generally, after a velo phase or 4-6 weeks before competition
Pitch Design/ Bullpens
-
- Purpose: Focus on the development of the athlete’s pitch arsenal
- Duration: 4-6 weeks -Time can be split between flat ground and then transitioning or “blending” to the mound
- When: Late off-season/Pre-season
In-Season Maintenance Phase
-
- Purpose: To maximize performance once competition begins. A large emphasis is also placed on expediting recovery from maximum intent outings in order to maintain velo and arm health throughout the season
- Duration: 4-20 weeks- basically the length of the season
- When: In-Season and after a prolonged time off. Also great for relievers who need to be ready to go on short notice
E. Performing Long Toss – We use long toss to increase intensity in the throw and get the arm used to the stress (otherwise known as Davis’ Law) that will be placed on it once throwing is off the mound. We also program our athletes long toss distances into their programs based off their max velo which is entered into their throwing program / distance template. Some other reasons we perform long toss are:
-
- Increase elbow extension velocity
- To help increase MER (layback)
- Shoulder internal rotation
We also program “connected long-toss”, a method we first heard about years ago from Ron Wolforth at the Texas Baseball Ranch. This involves using various constraint drills up to 90 feet and then keeping throws on an arc to max distance. When 3 throws are achieved without the athlete receiving not having to move, only then can the distance be progressed.
When performing “indoor long-toss”, we throw to different levels up into the net which correlate with distance. It’s not perfect but in January and February in the northeast it’s all we’ve got.
Remember to only throw on a line (compression throws) on high-intent days.
Part 4. Where Do We Begin?
That’s the million-dollar question and one that has many different layers and schools of thought. In our opinion, you can’t rush velo… Period! If you do, bad things happen.
Below is a “general” timeline as to how we break down what we can do with the time that we have. For example, if we have 2 months with the athlete, then walk across the table left to right, 3 months…
Also remember, we need to take the goals of the athlete into consideration.
Baseball Throwing Program – Closing Comments
The key to any off-season baseball throwing program is to have the athlete get assessed before they shutdown. This alleviates having to on-ramp back up in order to get the arm into “throwing shape” to throw hard enough for an accurate Mocap and video analysis. This also prevents us to prescribe throwing drills into the on-ramping phase, based off what we see during the analysis. We can’t fix what we can’t see.
See ya’ in the gym…
By Nunzio Signore (BA, CSCS, CPT, NASM, FMS) and Mike Lembo (BS, RPP Pitching Coordinator)
If you’d like to be placed on our email list please enter your email address below!
One Reply to “How to Build a Baseball Throwing Program”
Comments are closed.