
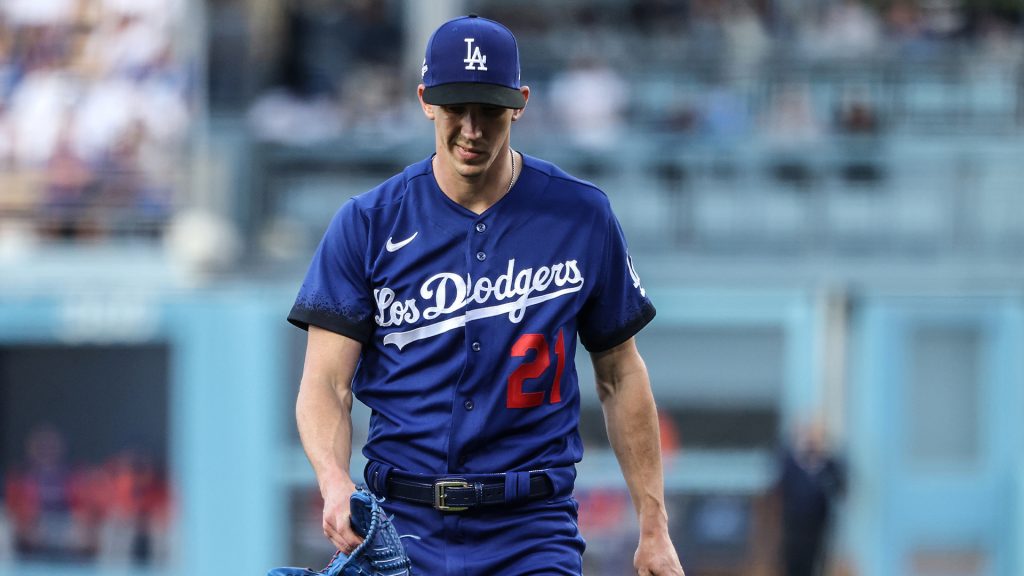
During the past several years, we have been rehabbing many ball players sent to us by various well-renowned surgeons in the NY/NJ area with great success. Today, we are going to cover a topic that unfortunately has become more mainstream than ever, What to Expect after Tommy John Surgery? We’re going to review what goes into bringing a pitcher or position payer back from Tommy John surgery as QUICKLY and as SAFELY as possible.
But first, let’s briefly talk a bit about the Epidemic, the injury itself and some possible contributors.
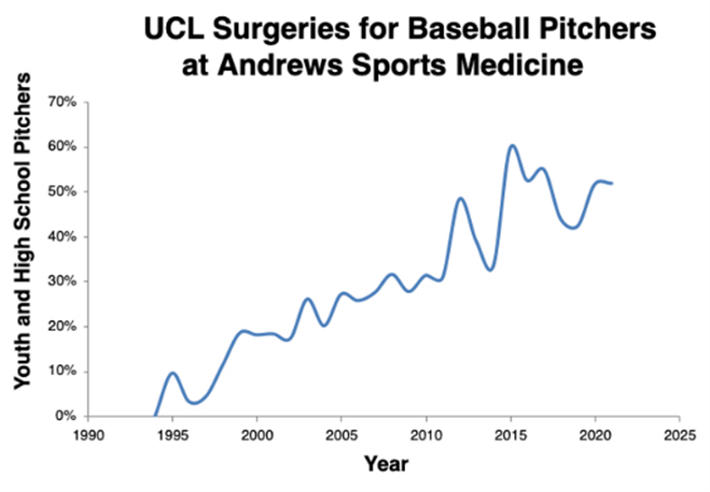
It was not long ago that pitchers going in for a TJ surgery was sporadic and somewhat uncommon. You’d still hear about it, but it wasn’t like it is today. Unfortunately, things have changed quite a bit. Here is a graph showing the rise in Tommy John surgeries performed on youth and high school players each year by renowned orthopedist Dr. James Andrews (from the American Sports Medical Institute). As you can see from the chart below, unfortunately we are trending upwards!
We are not here to discuss how this epidemic came about, but there are many contributing factors which need attention outside the scope of this article, including:
-
- Overuse and related topics
- Sport specialization
- Poor mechanics combined with overuse leading to increased stress on the elbow
- Higher velocities and the corresponding higher stress on the elbow
Now let’s get to it… What should you expect after you have had surgery and how do you get back on the mound as quickly and as safely as possible.
Training / Programming
Returning from TJ surgery has several different components that need to be sequenced and orchestrated together to get the athlete back to game-form:
-
- Physical Therapy (PT)
- Strength Training
- Throwing
- Pitching
Recovery from TJ is about a steady progression over many months with input from all parties involved, including your body and your arm. The program and its progression should be modified to meet the specific needs of each individual athlete. We generally like to see athletes begin strength training as early as 3-4 weeks post-op. This allows us to begin working on the remainder of the body (excluding the arm) so that once we can begin training the arm, we are not looking at a completely de-conditioned athlete. In addition, we also believe that getting back and training in the weight room helps the athlete feel athletic and not like a broken rehab patient.
This is usually done in conjunction with the work they are doing with their PT. It is important to note that every athlete’s timeline is different for many reasons. Because there is individual variability in all throwing athletes, there is no set timetable for completion of the program. Most athletes, by nature, are highly competitive individuals and wish to return to competition as early as possible. While this is a necessary quality of all athletes, the proper channeling of the athlete’s energies into a rigidly controlled program is essential to reduce the chance of re-injury during the rehabilitation process.
Although there are several different types of surgery options for TJ, the timeline outline below is for a full reconstruction of the UCL (a “bracing” will generally have a quicker back to play timeline). Here is a rough breakdown of the timeline (beginning 3 weeks after surgery).
Month 1 (beginning 3 weeks after post-op):
-
- Full body workout 3x’s/week (eccentric training is used on the good arm to help with “cross-education” to the other)
- Mobility work
- No plyometrics (due to the risk of falling)
- NO throwing
Month 2
-
- The injured arm is still not being utilized yet, but strength training continues, and volume is increased by using “split days”
- Max strength and mobility work continues
- No plyometrics
- NO throwing
Month 3
-
- By now, generally, the athlete has been cleared to train the other arm from a strength standpoint (but must have a note from their doctor or PT)
- Full-body strength work continues
- Low-level plyometrics are introduced
- NO throwing

Months 4-8
Strength Training – At this point, there should be no more restrictions on strength training, unless informed otherwise by the PT / Dr. This means that our timeline for getting the athlete physically ready for in-game performance will begin. Which strength phase an athlete starts in will be based primarily on the physical condition of the athlete and their “lowest hanging fruit”, whether it be strength or power.
In addition, by following the outline below, we can help stabilize the injured elbow and prevent injury recurrence both before the initiation of the progressive throwing program by:
-
- Strengthen the Periscapular Muscles
- Strengthen the “Flexor / Pronator” Groups
- Strengthen the Rotator Cuff
- Strengthen the Core Musculature
- Improve Shoulder Mobility
- Controlling Excessive ROM During the Season
Throwing Program (Phase 1) – Generally, somewhere around the 5th month, depending on you progress, you can begin a back-to-throw program with weekly increases in intensity. We refer to this as Phase 1 and it should be on flat ground only. Throwing should be monitored to ensure specified throwing intensities are being applied correctly.
Phase 1 is a 10-12 step process, which consists of throwing at each step 2 to 3 times without pain or symptoms before progressing to the next step. The object of each step is for the athlete to be able to throw the ball without pain at the specified distance (45 ft., 60 ft., 90 ft., and 120 ft.) and intensities for that step with the use of a radar gun. Throwing should be performed 2-3 days per week, with 1-2 days of rest between steps, unless otherwise specified by the physician. Intensities need to be prescribed so that the athlete follows a rigid progression and does not overdo it.
Simply giving the athlete a “percentage of perceived exertion based off of distance” does not cut it, as it is completely possible to throw at 100% intensity from only 10 ft away. As a result, we have developed a proprietary chart/schedule to help the athlete use their velocity (based off where they were topping-out when healthy). It is also especially important to let the athlete know to “listen to your arm” and if soreness/pain is present do not advance to the following step’s intensity.
We generally recommend using the Crow-Hop method for this stage of the rehab. The use of the Crow-Hop method simulates the throwing act, allowing emphasis of the proper body mechanics. Components of the Crow-Hop method are first a hop, then a skip, followed by the throw. Once again, the velocity of the throw should not be determined by the distances, rather a radar gun is a much better choice to ensure that the intensities are being maintained. Emphasis should be placed on proper throwing mechanics.
Months 9-12
Strength Training – From a timing standpoint, by now the athlete should be on a periodized training program similar to any healthy athlete with the focus being on explosiveness and power-endurance.
Throwing Program (Phase 2) – After the completion of Phase I of the throwing program, if the athlete can throw to the prescribed distance without pain he should be ready for throwing off the mound or return to their respective position. At this point, full strength and confidence should be restored in the athlete’s arm.
Just as the advancement to this point has been gradual and progressive, the return to unrestricted throwing must follow the same principles. A pitcher should first throw only fast ball at 50%, progressing to 75% and 100%. When the athlete reaches 100% on his FBs, he can start more stressful pitches such as breaking balls. The position player should simulate a game situation, again progressing at 50-75-100%. Once again, if an athlete has increased pain, particularly at the joint, the throwing program should be backed-off and re-advanced as tolerated, under the direction of the rehabilitation team.
If all goes well with no minor setbacks, it is possible for an athlete to be back to play in as soon as 11 months. Once again, it is important to note that every athlete’s timeline is different as well as taking the type of UCL procedure into account.
Some Key Considerations
The following is a list of important considerations that should be considered / incorporated as a part of any rehab program:
-
- Warm-up – We recommend 15-20 minutes of soft tissue/rotator cuff activation work be performed prior to any throwing. 5-10 minutes of a dynamic warm-up may also assist in warm-up. This can help with increases in blood flow to the muscles and joints thus increasing their flexibility and decreasing the chance of re-injury. Since the amount of warm-up will vary from person to person, the athlete should warm-up until developing a light sweat, then progress to the mobility/soft tissue phase.
- Mobility – Since throwing involves all muscles in the body, all muscle groups should be either stretched if tight, or soft tissue work should be performed if indicated on the athlete’s program. This should be performed prior to any throwing.
- Throwing Mechanics – A critical aspect of the program is improving throwing mechanics to reduce stress on the elbow. When intensity reaches above 65%, the athlete should be filmed, and an assessment of throwing mechanics should be performed. Mechanical re-mapping drills can and should be used from this point going forward in in the throwing program.
- Pain – During the recovery process the athlete may experience soreness and a dull, diffuse aching sensation in the muscles and tendons. This is normal. However, if the athlete experiences sharp pain, particularly in the joint, stop all throwing activity and consult with the rehab team. If pain continues, contact your physician or PT.
- Velocity – It is not unusual for an athlete to throw harder post TJ vs. before. Unfortunately, some attribute this to a new TJ ligament. In reality, it’s about the significant amount of re-conditioning that the athlete has done during the rehab process. In most instances, the injury itself is a wake up call on taking care of your body and arm.
- Setbacks – Unfortunately, setbacks can occur during this process. They can range from mental to physical. Initially, athletes can be slightly fearful of throwing which can take a little time to get over. General tightness, soreness and related maladies can occur which also may delay the timeline. It’s extremely important for the athlete to be in constant dialog with his rehab team.
Podcast: Tommy John Surgery Options with Dr. Casey Pierce
Interested in learning more about Tommy John surgery options, you can check out my podcast with Dr. Casey Pierce, a board-certified Orthopedic Surgeon, fellowship-trained in sports medicine and arthroscopy. He completed a specialized fellowship at the prestigious American Sports Medicine Institute (ASMI) in Birmingham, Alabama. Enjoy!
See ya’ in the gym.
By Nunzio Signore (Owner at RPP Baseball)
If you’d like to be placed on our email list please enter your email address below!